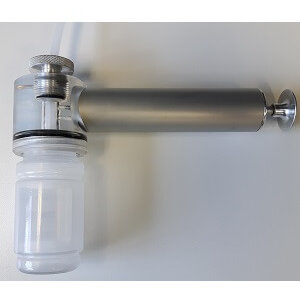
Sample Pump
The 38U Sample Pump, comes complete a 38mm suction pump, a small roll of heat resistant sample tubing (1/4″ OD) and a 100ml flush jar.
Directions for Use
The following step-by-step guide explains how to use a Sample Pump.
- Run the engine sufficiently to warm the oil in the sump, taking into account the sump volume and current oil temperature.
- Once the oil is warm, shut off the engine.
- Immediately proceed with the sampling procedure before settling occurs in the sump.
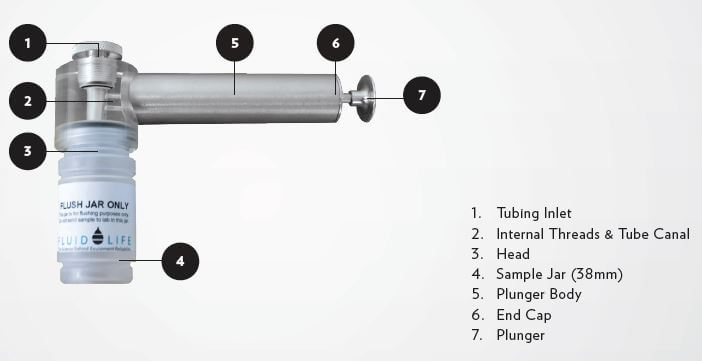
- Begin by screwing a sample jar onto the bottom of the pump head. Insert the tubing through the top of the pump until it is protruding into the sample bottle by 1–2cm. Tighten the aluminum nut to seal the unit.
- Place the free end of the tubing into whatever it is you are sampling. Insert a new tube through the dipstick or filler neck holes to approximately the midpoint of the oil. Take care not to sample directly from the bottom of the sump to avoid sampling any contaminants that may have settled there (water, glycol etc.). Two to three strokes of the plunger are all that is usually required. Try to keep the pump level and be careful not to draw oil into the plunger body or overfill the bottle, as this will require disassembling and cleaning of the pump. Use only clean, new sample containers, and take care to avoid skin contact with used oil. Do not overfill sample container — aim for it to be approximately 80% full.
- As the oil level in the bottle nears the top, loosen the aluminum nut to break the vacuum and stop the flow. always leave 1–2cm of air space in the bottle, and be sure to tighten the lid after the sample has cooled.
- Label immediately with full sample details, including unit number, engine type, date, kilometers on oil, kilometers on unit, oil type and grade, and any repairs and/or service during drain interval. Remember, too much information is always better than too little.
- A 38mm bottle will have been provided to use for flushing the tubing between samples. Once the tubing is in place you are ready to draw the next sample using the unmarked bottle to draw some oil and flush the previous sample from the tubing.
- Do not delay in shipping the sample to the appropriate analysis laboratory, and avoid stockpiling samples for shipping.
troubleshooting
If you are noticing that there is leaching past the seals or the rod becoming wet, this may be an indication that the seals have been compromised. This can lead to cross-contamination of pulled samples.
If you fill up the bottle past 80% full and do not break the seal as recommended above, the oil will get pulled up into the vacuum chamber – making the inside of the chamber ‘wet’. When this happens, it will eventually degrade the seals, but more importantly, it will be harder to create a vacuum going forward, rendering the suction pump incapable of pulling oil samples. This is a common mistake, and when this occurs, one option would be to open up the pump and clean out the vacuum chamber with a rag. The other options would be to replace the seals if necessary or simply purchase a new pump.
In general, O-rings can wear out over time and should be replaced regularly to prevent oil from entering the pump area.
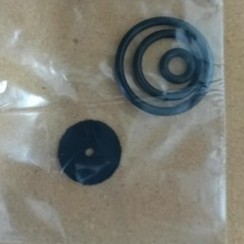
Replacement Seal Kit (CHK-38URK or 100246)
The replacement seal kit for the 38U sample pump consists of 3 O-rings and a “flapper” valve. Below is an image of a dismantled 38U sample pump to show seal locations.
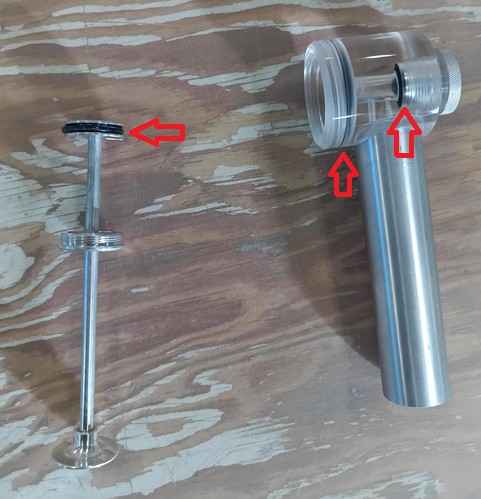
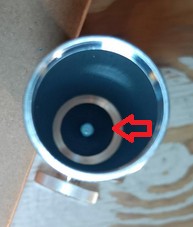
Flapper valve location:
Download Directions
Buy Online
-
 Sample Pump$50.00
 -
 Sample Pump Repair Kit$12.00